What's Proxmox VE
Proxmox Virtual Environment is an open source server
virtualization management solution based on QEMU/KVM and LXC. You can
manage virtual machines, containers, highly available clusters, storage
and networks with an integrated, easy-to-use web interface or via CLI.
Proxmox VE code is licensed under the GNU Affero General Public License,
version 3. The project is developed and maintained by Proxmox Server Solutions GmbH .
安装
Ref:
https://zhuanlan.zhihu.com/p/62084071
https://einverne.github.io/post/2020/03/proxmox-install-and-setup.html
安装 win10
Ref:
https://zhuanlan.zhihu.com/p/62492187
显卡直通
Ref:PVE下安装Windows10并直通核显、键盘鼠标、声卡等设备详细步骤
安装 linux
Ref:
https://post.smzdm.com/p/a78egn7o/
server
ubuntu--vg-ubuntu--lv
磁盘扩容
Ref:
https://serverfault.com/questions/953174/how-do-i-expand-the-roots-volume-size
First, you can use lvextend to extend the size of the
logical volume, to fill up the remaining space:
Now, you can resize the filesystem in that logical volume.
1 sudo resize2fs /dev/mapper/ubuntu--vg-ubuntu--lv
Finally, you can see the end result:
安装qemu-guest-agent
参考https://pve.proxmox.com/wiki/Qemu-guest-agent
https://foxi.buduanwang.vip/virtualization/pve/530.html/
1
2
apt-get install qemu-guest-agent apt-get install spice-vdagent
然后打开 “数据中心->pve->VMname->选项->QEMU Guest
Agent”
Ref:
https://www.d3tt.com/view/239
omv 磁盘丢失
OMV 断电后,没有卸载文档,直接将磁盘从omv硬盘接口取下,重启后提示
磁盘丢失。
Ref: https://www.jianshu.com/p/5a78668b0670
Ref: https://zhuanlan.zhihu.com/p/357495418
omv decker
Ref: https://zhuanlan.zhihu.com/p/360126067
pve删除lvm扩容步骤
Ref:
https://www.jianshu.com/p/bdb83531c56d
https://wp.gxnas.com/10402.html
防火墙
Ref:
https://www.pianshen.com/article/72122018797/
https://foxi.buduanwang.vip/virtualization/pve/508.html/
SPICE远程连接
Ref:
https://i.opat.vip/738.html
Proxmox
VE直通硬盘(全盘映射方式)
Ref:
https://wangxingcs.com/2020/0227/1411/
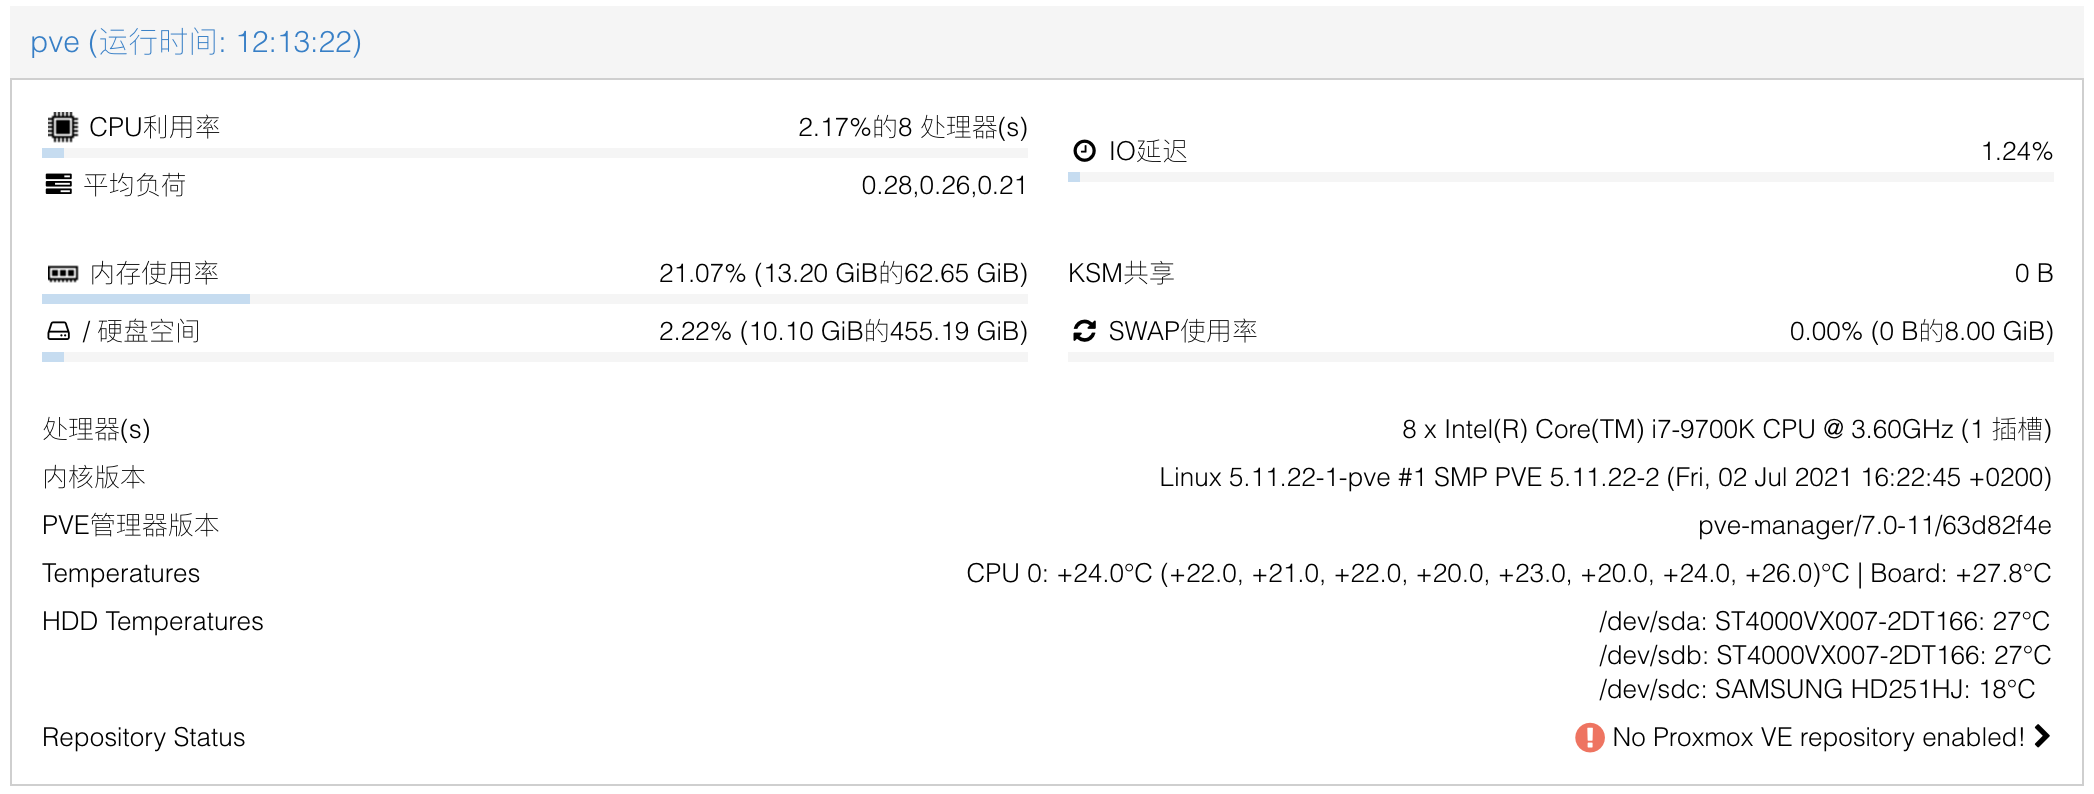
Proxmox
VE web 界面添加硬件温度显示(CPU温度和硬盘温度都显示)
Ref:
https://www.sjrkhb.com/article/3.html
https://oswu.cc/?p=99
安装温度检测软件
CPU
及主板温度检测:lm-sensors
1 sudo apt-get install lm-sensors
安装完成后执行 sensors-detect
进行传感器探测,通常情况下 全部默认选择 yes 即可
探测完成后执行 sensors 测试传感器
1 2 3 4 5 6 7 8 9 10 11 12 13 14 15 16 17 18 19 20 21 22 23 24 25 26 27 28 29 30 31 32 33 34 35 $ sensors coretemp-isa-0000 Adapter: ISA adapter Package id 0: +25.0°C (high = +86.0°C, crit = +100.0°C) Core 0: +22.0°C (high = +86.0°C, crit = +100.0°C) Core 1: +21.0°C (high = +86.0°C, crit = +100.0°C) Core 2: +23.0°C (high = +86.0°C, crit = +100.0°C) Core 3: +25.0°C (high = +86.0°C, crit = +100.0°C) Core 4: +22.0°C (high = +86.0°C, crit = +100.0°C) Core 5: +21.0°C (high = +86.0°C, crit = +100.0°C) Core 6: +24.0°C (high = +86.0°C, crit = +100.0°C) Core 7: +22.0°C (high = +86.0°C, crit = +100.0°C) nvme-pci-0400 Adapter: PCI adapter Composite: +30.9°C (low = -273.1°C, high = +83.8°C) (crit = +84.8°C) Sensor 1: +30.9°C (low = -273.1°C, high = +65261.8°C) Sensor 2: +29.9°C (low = -273.1°C, high = +65261.8°C) acpitz-acpi-0 Adapter: ACPI interface temp1: +27.8°C (crit = +119.0°C) iwlwifi_1-virtual-0 Adapter: Virtual device temp1: N/A nvme-pci-0200 Adapter: PCI adapter Composite: +26.9°C (low = -273.1°C, high = +84.8°C) (crit = +84.8°C) Sensor 1: +26.9°C (low = -273.1°C, high = +65261.8°C) Sensor 2: +24.9°C (low = -273.1°C, high = +65261.8°C)
在如上输出中,“acpitz-acpi-0” 是主板温度,“coretemp-isa-0000” 是 CPU
温度。
硬盘温度检测:hddtemp
1 user@pve:~$ sudo apt install hddtemp
安装完成后执行 hddtemp /dev/sd? 测试传感器
1
2
3
4
user@pve:~$ sudo hddtemp /dev/sd?/dev/sda: WDC WD40EZRZ-00WN9B0: 29°C /dev/sdb: ADATA SP600: 26°C /dev/sdc: WD2500: 29°C /dev/sdd: ADATA SP900: 38°C
由于 PVE 的 web 服务以用户 www-data 身份运行,需要修改 hddtemp
的权限
1 user@pve:~$ sudo chmod +s /usr/sbin/hddtemp
编辑 PVE web 服务文件
Nodes.pm
编辑文件 /usr/share/perl5/PVE/API2/Nodes.pm,跳转到
my $dinfo = df('/', 1); 位置,编辑成如下所示
1 2 3 4 5 6 7 8 9 $res ->{pveversion} = PVE::pvecfg::package () . "/" . PVE::pvecfg::version_text(); $res ->{temperatures} = `sensors` ; $res ->{hdd_temperatures} = `hddtemp /dev/sd?` ; my $dinfo = df('/' , 1 );
pvemanagerlib.js
修改页面样式以完整显示数据
编辑文件
/usr/share/pve-manager/js/pvemanagerlib.js,跳转到
gettext('Status') + ': ' + zpool, 位置,编辑成如下所示
1 2 3 4 5 6 7 8 9 var win = Ext .create ('Ext.window.Window' , { modal : true , width : 800 , height : 500 , resizable : true , layout : 'fit' , title : gettext ('Status' ) + ': ' + zpool, items :[{
跳转到 widget.pveNodeStatus 位置,编辑成如下所示
1 2 3 4 5 6 7 8 extend : 'PVE.panel.StatusView' , alias : 'widget.pveNodeStatus' , height : 400 , bodyPadding : '20 15 20 15' , layout : {
两处 height 的值需按情况修改,每多一行数据增加
20
例如有 1 行 CPU 与主板温度数据、3 行硬盘温度数据(3 块硬盘),即为
480 与 380
添加显示内容
跳转到 PVE Manager Version 位置,编辑成如下所示
1 2 3 4 5 6 7 8 9 10 11 12 13 14 15 16 17 18 19 20 21 22 23 24 25 26 27 28 29 30 31 32 33 34 35 36 37 38 39 40 41 42 43 44 45 46 47 48 49 50 51 52 53 54 55 56 57 58 59 60 61 62 63 64 65 66 67 68 69 70 71 72 73 74 75 76 77 { itemId : 'version' , colspan : 2 , printBar : false , title : gettext ('PVE Manager Version' ), textField : 'pveversion' , value : '' }, { itemId : 'temperatures' , colspan : 2 , printBar : false , title : gettext ('Temperatures' ), textField : 'temperatures' , renderer : function (value ) { value = value.replace (/Â/g , '' ); let data = []; let cpus = value.matchAll (/^coretemp-isa-(\d{4})$\n.*?\n((?:Package|Core)[\s\S]*?^\n)+/gm ); for (const cpu of cpus) { let cpuNumber = parseInt (cpu[1 ], 10 ); data[cpuNumber] = { packages : [], cores : [] }; let packages = cpu[2 ].matchAll (/^Package id \d+:\s*([^°]+).*$/gm ); for (const package of packages) { data[cpuNumber]['packages' ].push (package[1 ]); } let cores = cpu[2 ].matchAll (/^Core \d+:\s*([^°]+).*$/gm ); for (const core of cores) { data[cpuNumber]['cores' ].push (core[1 ]); } } let output = '' ; for (const [i, cpu] of data.entries ()) { output += `CPU ${i} : ` ; if (cpu.packages .length > 0 ) { for (const packageTemp of cpu.packages ) { output += `${packageTemp} °C ` ; } } if (cpu.cores .length > 0 ) { output += '(' ; for (const coreTemp of cpu.cores ) { output += `${coreTemp} , ` ; } output = output.slice (0 , -2 ); output += ')°C' ; } output += ' | ' ; } let boardTemp = value.match (/^acpitz-acpi-\d+$\n.*?\n^temp1:\s*([^°]+).*$/m ); if (boardTemp.length > 0 ) { output += `Board: ${boardTemp[1 ]} °C | ` } output = output.slice (0 , -3 ); return output; } }, { itemId : 'hdd-temperatures' , colspan : 2 , printBar : false , title : gettext ('HDD Temperatures' ), textField : 'hdd_temperatures' , renderer : function (value ) { value = value.replace (/Â/g , '' ); return value.replace (/\n/g , '<br>' ) } } ],
其中处理数据的正则式与返回值可能需按实际情况进行修改
完成
执行 systemctl restart pveproxy 重启 PVE web 服务
在浏览器中清除 PVE
控制台的缓存 ,重新加载即可在节点概要显示温度信息
pve-temperatures